Shrink TempDB database in SQL Server
 by
by This article explores the usage of TempDB and different ways to shrink the TempDB database in SQL Server.Each instance of Microsoft SQL Server has a system database TempDB. It is a backbone for the SQL Server instance. Let’s review the TempDB database and its usage with ways to shrink the TempDB database in the further sections of this article.
Few important points about TempDB
- TempDB is a global resource (available for all connected user) system database
- SQL Server recreates the TempDB database each time SQL Service restarts. During restart, it takes a copy of MDF and LDF from the model database. The size and number of MDF and LDF files reset to preconfigured size
- SQL Server does not perform recovery on the TempDB, and previous data is lost
- TempDB database is always in the Simple recovery model, and we cannot take database backup for it
- We cannot roll back transactions in the TempDB because it minimally logs the transactions
TempDB Usage Summary
- Usually, we create local temporary tables (# naming conventions) and global temporary tables (## naming conventions) to prepare intermediate tables. SQL Server creates those temporary tables in the TempDB database
- We can create or rebuild an index in TempDB using the SORT_IN_TEMPDB= ON clause. SQL Server performs all sorting calculations in the TempDB instead of the database on which the object belongs
- SQL Server uses the TempDB for the Read COMMITTED SNAPSHOT isolation level. SQL Server uses the row versioning for each record. The old version also gets an additional 14 bytes in the TempDB to track the row versioning
- Internal objects such as Cursor work tables, Spool operations, Intermediate sorts operations such as GROUP BY, ORDER BY, UNION, DBCC CHECKDB, Temporary large object storage, Service broker event notification
- In the Multiple Active Result Sets (using MultipleActiveResultSets=True), SQL Server uses the versioning and stores that in the TempDB
Overview of Shrink TempDB activity
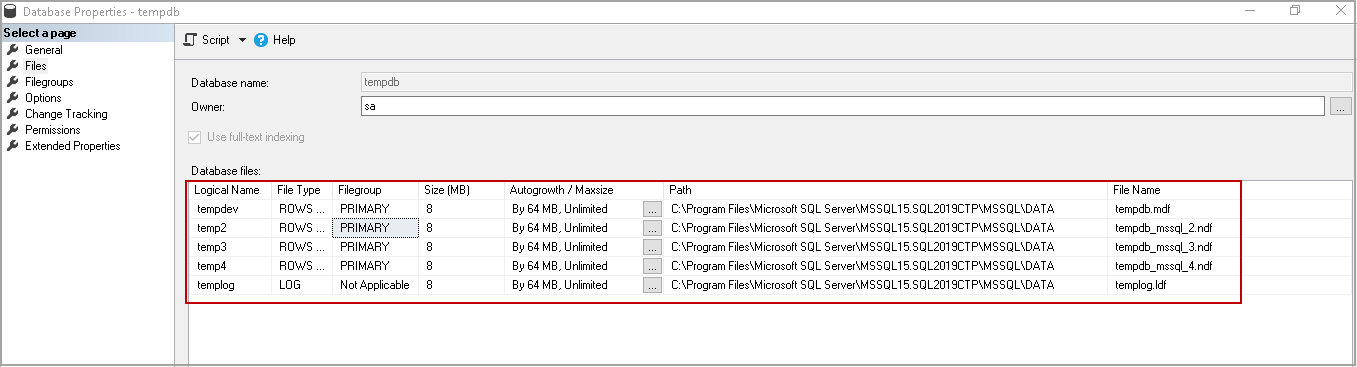
Starting from SQL Server 2016, the installation wizard automatically detects the CPU cores and creates the necessary number of database files for the TempDB. It also sets the maximum growth of individual files to 64 MB.
In the following screenshot, you can see the TempDB configuration for my demo SQL instance.
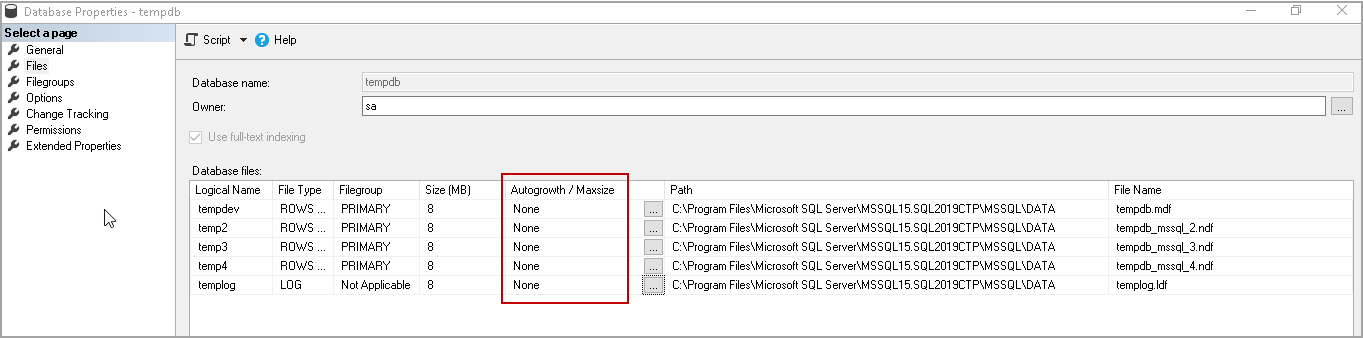
For this demonstration, I will disable the Autogrowth for the TempDB database.
- Note: Please do not ever do this on the production instance; I am doing it on my test instance for demo purposes only
Execute the following query to create a local temporary table and insert data into it.
1 2 3 4 5 6 7 8 9 10 11 12 13 14 15 | CREATE TABLE #TempTable (col1 char(1000), col2 char(1000)) SET NOCOUNT ON; DECLARE @i INT = 1 BEGIN TRAN WHILE @i <= 150000 BEGIN INSERT INTO #TempTable values ('A','B') SET @i += 1 END COMMIT TRAN DROP TABLE #TempTable |
It gives the following error message. SQL Server could not increase the size of the TempDB log file and unable to perform the transaction. You might think that we disabled the autogrowth, and if we enable autogrowth to resolve the issue. Consider this situation like the TempDB log file grown to the size of the disk, and you do not have sufficient free space in the disk for the log file to grow.

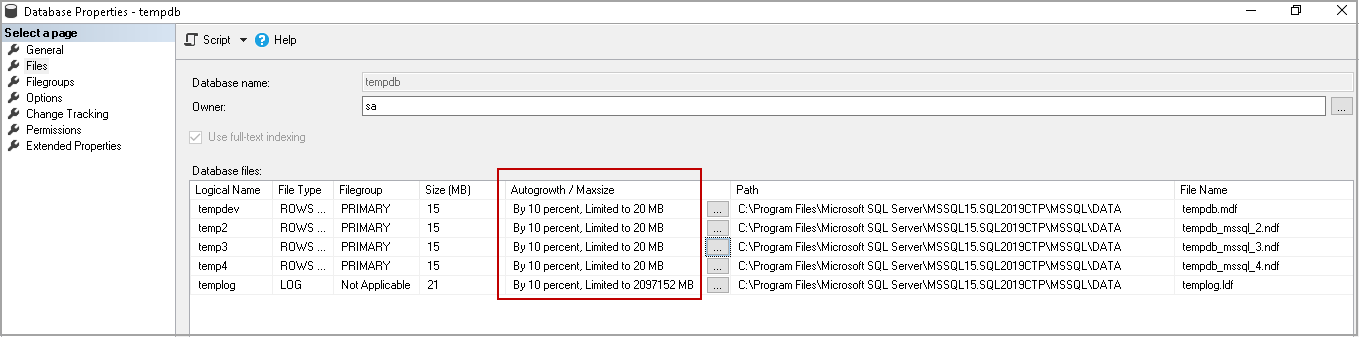
Let’s enable the autogrowth for data files with a maximum size of 20MB for each data file. We can see that log file growth for the TempDB is enabled, and it does not have maximum file size.
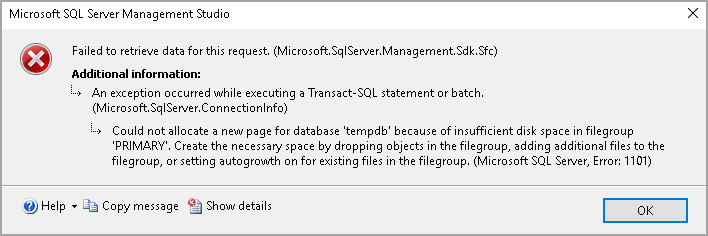
Let’s rerun the query to fill up TempDB and see the error message. SQL Server primary filegroup does not have free space.

At this point, if you try to refresh SQL instance as well, you get a similar error message.
Different ways to shrink TempDB database
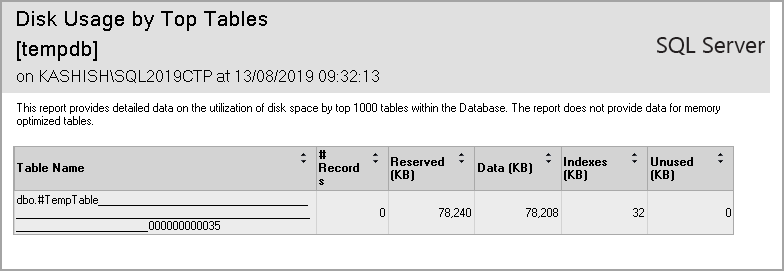
You can look at the disk usage by top tables report to check what are the objects consuming space in the TempDB. Right-click on the TempDB-> go to Reports-> Standard Reports-> Disk Usage by Top Tables.
In this screenshot, we can see #TempTable is consuming the space in the TempDB.
You can drop the existing object in the TempDB, and it should release the space for you. It is not possible every time to drop objects, especially in the production instance. We could lose all previous work due to this.
Shrink TEMPDB using DBCC SHRINKFILE
We can use the DBCC SHRINKFILE command to shrink the data or log file for the TempDB. We do not need a restart of SQL Service in this case.
1 | DBCC SHRINKFILE(logical_filename, size_in_MB) |
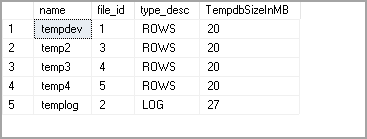
Execute the following query to get individual file size in TempDB.
1 2 3 4 5 6 7 | SELECT name, file_id, type_desc, size * 8 / 1024 [TempdbSizeInMB] FROM tempdb.sys.database_files ORDER BY type_desc DESC, file_id; |
Let’s try to shrink TempDev data file using the DBCC SHRINKFILE command.
1 | DBCC SHRINKFILE(tempdev,10) |
It performs the shrink, and you get the following output.

You can further try to shrink the file.
1 | DBCC SHRINKFILE(tempdev,0) |
In this way, we need to shrink the individual data or log files.
Shrink TEMPDB using DBCC SHRINKDATABASE command
We can also shrink the TempDB database using the DBCC SHRINKDATABASE command. The Syntax for the command is as follows.
1 | DBCC SHRINKDATABASE(TempDB, ‘target_percentage_of_free_space’); |
Let’s use this command to shrink TempDB and leave 10 percent free space.
1 | DBCC SHRINKDATABASE(tempdb, 10); |
It performs the database level shrink, and you get the following output.
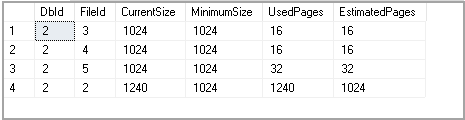
You can check the size of the data and log files for the database using tempdb.sys.database_files.
Resize TempDB using ALTER DATABASE command
We can use the Alter command to resize the tempdb files. Suppose the initial size of the data and log is 1 GB, we can use this command to set it at a lower level.
The following command resizes the TempDEV and TempLog file initial size to 100 MB.
1 2 3 4 5 6 7 8 | USE master; GO ALTER DATABASE tempdb MODIFY FILE (NAME = tempdev, SIZE=100Mb); GO ALTER DATABASE tempdb MODIFY FILE (NAME = templog, SIZE=100Mb); GO |
We need to restart SQL Services for this setting to take effect.
Shrink TempDB using SSMS
We can use the SSMS GUI method to shrink the TempDB as well. Right-click on the TempDB and go to Tasks. In the tasks list, click on Shrink, and you can select Database or files.
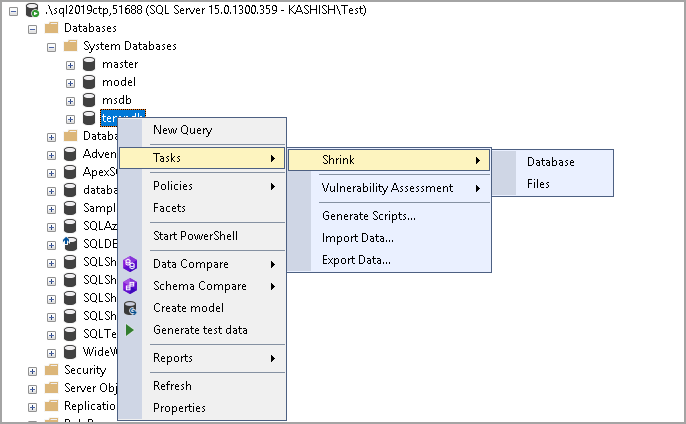
Both Database and Files options are similar to the DBCC SHRINKDATABASE and DBCC SHRINKFILE command we explained earlier.
Restart SQL Services to Shrink TempDB database
It should be the last option to recycle the TempDB database and resolve the disk space-related issues due to the TempDB data or log file space. In the production instance, it is difficult to find the downtime to restart the SQL Service. Therefore, you should consider the other options first and do it as a last option.
What if you try to shrink Tempdb, but it does not release space?
Sometimes you try to shrink the TempDB database and the command shows successful, but you do not see any free space in the database. It might be due to active transactions, versioning or objects required for the SQL Server in the TempDB as per the current workload.
Referencing to Microsoft article, we should shrink the TempDB when the SQL Server is in idle mode or the single-user mode.

We can still try to shrink the TempDB using the following method.
Execute the DBCC DROPCLEANBUFFERS command to flush cached indexes and data pages
1234CHECKPOINT;GODBCC DROPCLEANBUFFERS;GOExecute the DBCC FREEPROCCACHE command to clear the procedural cache
12DBCC FREEPROCCACHE;GO
Now, try to shrink the database using the earlier methods. You should give preference to DBCC SHRINKFILE instead of the DBCC SHRINKDATABASE command.
Shrink TempDB in Single user mode
Sometimes you cannot start the SQL Services due to TempDB size, and you require to reset the initial size using the alter database command. Suppose you executed the alter database command to resize the tempdb data file, but accidentally you specified the initial size of the file that is not feasible as per your free disk space. You tried to restart SQL Service, but it could not start because there is not sufficient free space in the drive to create the TempDB files.
You need to start SQL Services in minimal configuration mode and resize the TempDB files.
SQL Services should be in the stopped state to use the minimal configuration mode.
- Open a command prompt with administrative privilege
Go to the SQL Server Binary folder. In my SQL instance, the path for the BINN folder is as follows
C:\Program Files\Microsoft SQL Server\MSSQL15.SQL2019CTP\MSSQL\Binn
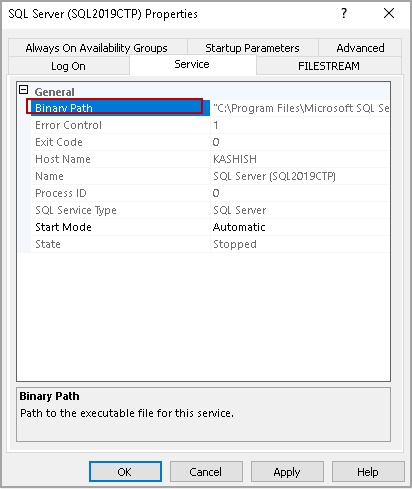
If you are not sure about the path, right-click on SQL Service in SQL Server Configuration Manager and the properties page, you can look at Binary path
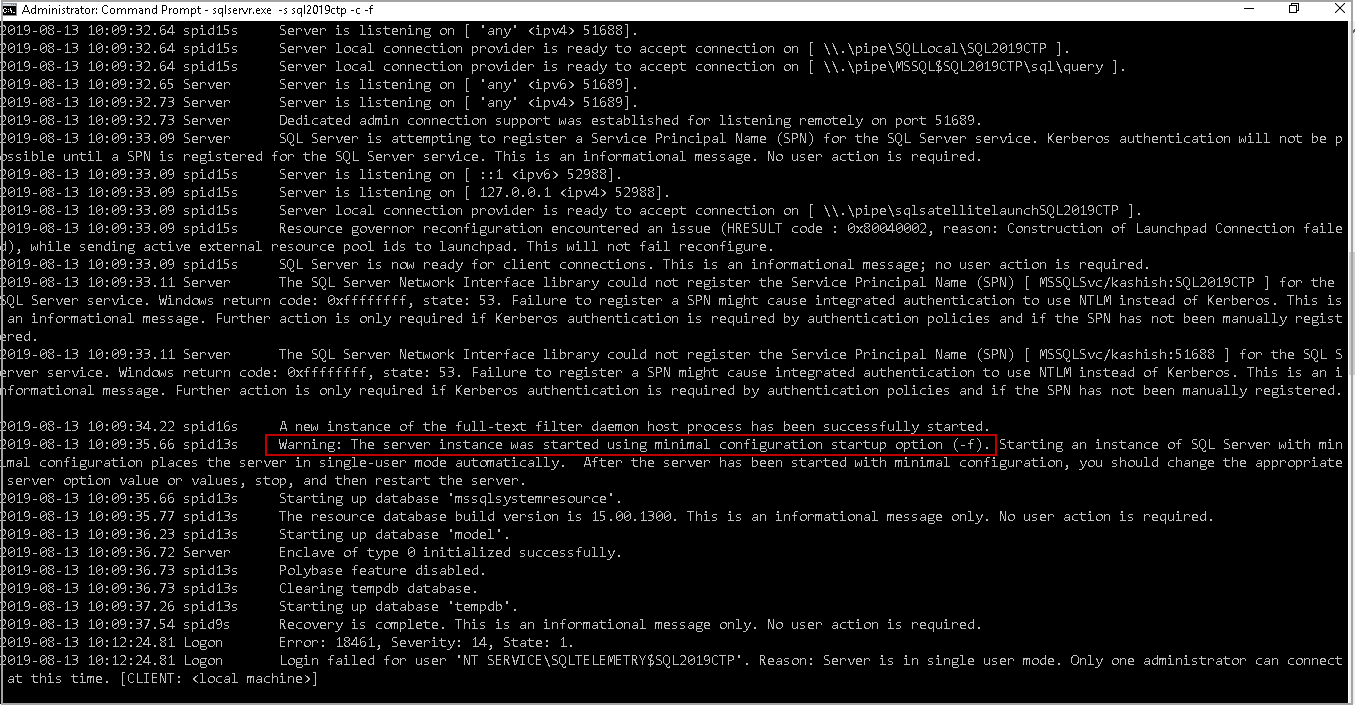
Execute the following command in administrative prompt ( for my SQL2019CTP instance)
sqlservr.exe -s SQL2019CTP -c -f
It starts SQL Services in minimal configuration mode, and you can see it as a warning message as well
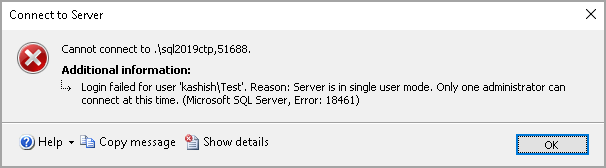
Open another command prompt and connect to the SQL server using the SQLCMD

Note: Only one administrator can connect to SQL Server at this time. If you try to connect, you get the following error message
Now, we can run the alter database command to resize the TempDB. You need to run the alter database command for eachtempdb file
12345678USE master;GOALTER DATABASE tempdbMODIFY FILE (NAME = tempdev, SIZE=100Mb);GOALTER DATABASE tempdbMODIFY FILE (NAME = templog, SIZE=100Mb);GO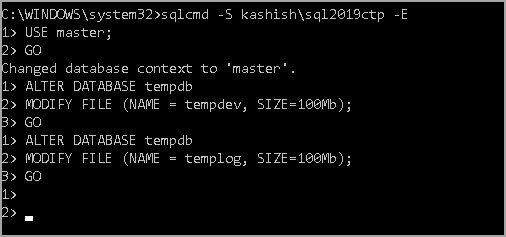
Return the administrative command prompt in which we started SQL Service in minimal configuration mode and press CTRL+C to exit

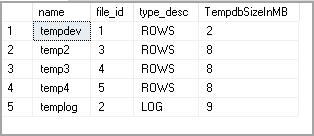
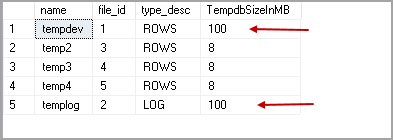
Start the SQL Services using the SQL Server Configuration Manager and verify the changes using the following query
123456SELECTname, file_id, type_desc, size * 8 / 1024 [TempdbSizeInMB]FROM sys.master_filesWHERE DB_NAME(database_id) = 'tempdb'ORDER BY type_desc DESC, file_idGOIn the screenshot, we can see that initial size for the TempDev and TempLog file is 100 MB
Conclusion
In this article, we explored the importance of the TempDB database in SQL Server and various methods to shrink the TempDB database. You should be aware of all these methods and take appropriate actions if required.
Statistics Says It All
16
Years of Experience
3000
Gratified Students
100
Training Batches
9600
Training Hours
Subscribe
Please subscribe our technical blog to get recent updates.